Gutter Repairs

Sylvain 026We’ve had great success with repairing numerous problems with gutter systems at various stratas.  We’ve added an experienced member to our team to ensure most of these repairs can be performed.

Issues and Repairs:

Installed on an inproper angle causing overflow before water can drain down the spout.  (click here to view an article explaining this elsewhere  in our blog).    In many cases these sections can be adjusted so that the angle allows for proper water drainage.

Gutters pulled away from the fascia board causing leaks, and leading toward the gutter falling off the building.  In many cases these can be reaffixed, so long as the board itself hasn’t rotted out behind the gutter.  In some cases we can repair this as well, but a rotting fascia board should be replaced.

A hole in the gutter, causing a leak.  This can usually be patched, solving the problem without needing to replace the entire section of gutter.

Gaps in the seams where caulking has worn away, causing leaks.  Gaps and seams can be recaulked – but this MUST be done in DRY weather, in favourable weather conditions to allow the caulking to set.  These issues should be noted and then repaired in summer months.  Temperature ranges are more favourable and wet weather will just causing the caulking to run or drip out of the seam rather than repair it.

Clogged down spout, causing water to overflow over the lip of the gutter.  Clogs can be flushed out, removed with a drain snake or flexible tool.

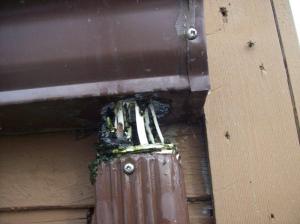
Disconnected down pipe, causing water to spray against the building and around the foundation, rather than be carried away properly by the system.  These pipes can be reattached if still on site, or replaced.

Missing gutter inserts, causing the spouts to become easily plugged by leaves and debris which can cover the hole.  New inserts can be placed inside, helping keep the top of the spout clear and allowing the water to drain out.

We clean your gutters, and service them as well.  If you are having an emergency issue, call us.  Become more proactive this year and avoid the cost of emergency call outs, get your issues dealt with promptly and have a more comprehensive gutter service set up for your stratas.
Spot Cleaning Product Selection

What To Look Out For

Everyone says their cleaning product is the best.  But how do you know what to really use for spot cleaning your carpet? With so many products out there, what should you look for to ensure that you’re using what you should for your carpet.

ServiceMaster Clean Residential product lines are developed by the R&D departments of a $5billion per year company to ensure they meet all necessary standards and requirements for excellence.  That’s how our green line or products was born.  However, you may not have that type of backing when selecting a cleaning agent from the local store.   Here’s what to look for, and a simple residue test if you need a quick solution and you don’t have time to call in the professionals at ServiceMaster Clean.

“WARNING! Do not use chlorinated cleaning solutions, quaternary solutions, petroleum

distillates, solvent-based cleaners, or citrus cleaning solutions.”

– Lees Carpet Manufacturing guide.

Here’s what to watch out for:

PH LEVEL: When selecting a cleaning agent, avoid products with pH levels over 9.5

Avoid – Toxicity: non-toxic, and inflammable solvents.

Avoid – Optical Brighteners:  They can adversely affect the coloration of carpet and lead to premature yellowing and aging.

Avoid – Sticky Residue:  Do not use a product on your carpet which will leave behind a sticky residue.  This will lead to rapid resoiling and the need for more frequent cleanings.

Sticky Residue Test

To test a solution to ensure that it does not leave a sticky residue, you can perform the following simple test:

  • Pour a small amount of the cleaning solution into a clean glass dish.
  • Let the dish stand uncovered to air dry, until all liquid has evaporated
  • Break up any hard residue left on the bottom of the glass dish.  If it is powdery, dry flakes, or dry crystals, this is an acceptable solution, as this can be vaccuumed out of the carpet fiber
  • If it is oily, greasy, sticky, or waxy the solution is not acceptable as this will stick to the carpet fiber and contribute to rapid resoiling

Really? They Don’t Believe in Programs?

A Message From David Benoit

In my 12+ years of working with property managers and building owners I have found the most effective property managers have their properties on some form of plan or program.  As you know there can be quite a turnover of property managers in the industry; they can get overwhelmed by having to respond to  buildings’ needs.

Looking back from this point the managers that are still in the industry are generally proactive in their approach.  This is a “Win-Win” for all parties involved.  The buildings get attention, the property manager can spend their time leading the buildings and the contractor will provide more competitive pricing.

Over the years the 1 most common objection I hear from property managers is, “the strata doesn’t believe in programs.”  My response to this is, “really?”  They don’t believe in cleaning their carpets, gutters, windows etc?  That tells me that the strata members would prefer to own in a building where they can’t see out their windows, where their gutters overflow and their carpets are disgusting and wearing out.

I think the truth is the strata’s haven’t thought it through and the property manager didn’t spend the time needed communicating to them the benefits of an overall plan. You can have 3 to 4 different contractors, but the key here is one calendar of when items will occur and by whom.

On a side note, the most successful property managers I know have only 2 trades they work with in each category.  This helps them stay on top of things and these contractors will do their absolute best to ensure that their customer’s buildings are taken care of with the fear of losing all of the work at that property manager’s buildings. Well run strata’s don’t use the council president’s nephew to clean the carpets.

I have never understood why buildings need to gather quotes every year for services that are generally done every year.  Does the strata think the pricing is going to come down?  If they did their due diligence in the initial process then why would that change?  Of course, if a contractor did not perform according to expectations or agreement, that’s a different story.  The truth is that most contractors will not raise prices on a yearly basis if the work is committed to and ongoing.  At ServiceMaster Clean Residential, we have carpet maintenance programs that are 10 years old and the pricing is still the same.  However when asked to quote on a yearly basis pricing generally trends upward. If we have a relationship with a building and our crews are familiar with the project we are grateful for the work and don’t see the need to raise pricing.

So in summary if you want to have a less stressful longer career make a plan for your buildings maintenance, my recommendation based on over a decade of experience and relationships with hundreds of property managers: only deal with a few trades and take the time to educate your stratas and building owners on the benefits for everyone of being proactive, having a plan, and maintaining your strata buildings.

Thanks for your time and consideration,

David Benoit

Features of ServiceMaster Building Maintenance Programs

Not CONTRACTS we keep our customers based on our performance not a signature

Can consist of a variety of our services carpet cleaning, windows, gutters, dryer vents etc…..

Our Carpet maintenance programs will ensure your carpet WARRANTY is valid

Your buildings will be taken care of by a company that has specialized in building cleaning services for over 20 years.

Spot Removal Technique

Daily removal of spots and spills helps maintain the carpet’s appearance between scheduled cleanings. Immediate action against spots and spills also reduces the probability of a permanent stain. It is important to use solutions that are appropriate for the specific type of spot or spill – water based, oil based, or solid, including gum. Use spotting solutions sparingly and always try to remove the spot with water only before using a spotting solution. If available, using a portable extractor will significantly improve the ability to remove spots.

Treating Water-Based Spots

For liquid spills, blot up as much of the liquid as possible with a clean white cloth. If the spill is semi-solid or has hardened, scrape it with a spoon or spatula and then blot the spot with a white cloth or damp sponge. Always work from the edge of the spot towards the center. Never rub across a wet spill in a manner that causes the stain or contamination to be spread from the original area.  If a spot remains after using water, refer to our spotting guide and choose the appropriate solution.  Apply a minimal amount of solution and use a hand brush to gently agitate the solution. Do not aggressively brush the spot. Rinse with water and allow the area to dry for about 1 hour and then vacuum. Repeat if necessary. Protect the freshly cleaned area until the carpet is completely dry.

Treating Oil-Based Spots

When removing oily stains such as paint, grease, tar or asphalt, always check for color fastness by applying your cleaning solution to an inconspicuous area of the carpet. Spray or pour the solvent onto a white cloth and press it onto the carpet. Check the cloth for any evidence of dye transfer to the cloth. If color transfer is evident, do not use the solution. If color fastness is not a problem, apply your solution sparingly to a clean white cloth and press the cloth onto the spot.  Again, do not rub across the stain; wipe gently from the outer edge toward the center of the spot.  Repeat the procedure until the spot has been removed. Rinse with water and allow the area to dry or about 1 hour and then vacuum. Protect the freshly cleaned area until the carpet is completely dry.

NOTE: HAVING A SMALL EXTRACTOR MACHINE HANDY ALWAYS MAKES IT EASIER TO FLUSH A SPOT AND REMOVE EXCESS MOISTURE. SPILL. IF A STAIN CANNOT BE REMOVED, PLEASE CONSULT A CARPET CLEANING PROFESSIONAL

Source: the Carpet Maintenance Spec Guide, from Interfaceflor.

Spot Cleaning – Identify and Cleaning Agent Selection

Previously in e-tips blog article we looked at the first step in protecting your carpets: entrance mats and vacuuming.   The second step in any program involves spot cleaning.

Spot cleaning should be as often as possible by you, or in a strata’s case, staff onsite   The goal is to remove whatever discoloring material adheres to the outside of the carpet fibres causing a visible spot – without harming the fabric of the carpet.

Before we get into how to remove spots from carpet, let’s first look at what you may find.

Types of Spots – Identification Leads to Eradication

Water Soluble:  Most spots are water soluble and will respond to water based cleaning solutions.  This is why you find a wide variety of water based cleaning solutions.

Non-Water Soluble: Most non-water soluble sots consist of oils, greases and pigments, etc.  Some of these can be converted to water soluble form enabling water based solutions to be used.

Non-Soluble: These cannot be dissolved with either wet or dry solvents.  (example, wax.)

Combination Spots:  Some spots are caused by substances that have both water solube and non-water soluble characteristics.   These spots require treatment of both water based and non-water based cleaners.

Chemical Spots: These are spots that must be first chemically reacted before using water based or non-water based solvents.  Examples: rust, medicines, urine, acids, alkalis, etc.

Surface Spots: The spotting material is present on the fibers or between the fibers.  Examples are grease, gum, glue.

Absorbed Spots: The spotting material is present in the fibers.  Penetration of the fibers has taken place.  Examples: coffee, ink, urine.

Compound Spots: The spot is present on and in the fibers.  Examples: paint, shoe polish, lipstick.

Destructive Stains: The staining material has altered the nature of the fibers.  Most destructive stains cannot be removed.  Examples: acids, bleaches, burns.

Dye Stains: This occurs when acid dyes are spilled onto carpet.  They are actually dyes that replace the former color of the fiber.

Dye Loss: If a stain is lighter than the color of th carpet, some dye loss has occurred which means that cleaning will not solve the problem.   Re-coloring is the best solution.

First identify what you’re dealing with, and then you can use the appropriate product to try and remove the spot.  Some, like destructive stains or dye stains may not be able to be removed.  For those that can, read below.

Spot Removal Guide

Source: the Carpet Maintenance Spec Guide, from Interfaceflor.

The chart below is a guideline for spot removal. Follow each step in order, proceeding to the next step only if the previous step failed to remove the stain. The use of a portable extractor with water is highly recommended for a first attempt at spot removal and can be used after each step to flush solution. For unknown spots use water first, and then try a dry cleaning solvent, followed by detergent solution.

Spotting Solutions

1. Detergent Solution – Mix 1/4 teaspoon colorless mild detergent in 1 cup water.

2. Ammonia Solution – Mix 1 tablespoon clear household ammonia in ½ cup water.

3. Vinegar Solution – Mix 1/3 cup white household vinegar in 2/3 cup water.

4. Dry Cleaning Solvent – Apply isopropyl alcohol (standard rubbing alcohol) to clean cloth and blot. DO NOT apply directly on carpet.

5. Scrape away as much as possible with a spoon or dull knife. Then use product in the next step to further address the stain.

The chart below shows you which solutions to try based on what is causing the spot or stain.

Spot/Stain

First Attempt

Second Attempt

Third Attempt

Beer

1

3

Blood

1

2

Butter or Margarine

4

1

Candle Wax

5,

then lay a towel or paper bag over top remaining wax, and iron it on medium heat, heating the wax and transferring to towel.

Chewing Gum

Harden gum with ice until brittle,

5

4 or use a commercial chewing gum remover

Chocolate

5

1

2

Cocktails

1

3

Coffee

1

3

Cough Syrup

1

2

Crayons

5

4

Egg (raw)

Blot

4

2

Food Coloring

1, until color no longer transfers to towel

2

Fruit Juice

1

2

Furniture Stain

4

Glue

1

4

Gravy

1

2

Greases

5

4

Ice Cream

1

2

Ink (ballpoint)

4

Ink (India)

4

Jam or Jelly

1

2

Ketchup or Tomato Sauce

1

2

Lipstick

5

2

Mildew

1

2

Milk

1

2

Mucilage

1

2

Mud

5

1

2

Mustard

1

3

Nail Polish

4

Apply amyl acetate or nail polish remover to cloth and blot.  PRETEST FIRST

Oils

4

Paint (oil based)

4

Paint (water based)

1

Rubber Cement

Roll the glue off when it has hardened sufficiently

4

Rust

Apply rust remover or warm oxalic acid solution for 10 – 15 minutes

2

Shoe Polish

4

Soft Drinks

1

2

Soot

1

4

Tar & Asphalt

5

4

Toothpaste

5

3

Urine

Blot as much as possible if still wet

1

3

Vomit

Blot as much as possible if still wet

1

2

Wine

1

3

<!–[if gte mso 9]> <![endif]–><!–[if gte mso 9]> Normal 0 false false false EN-CA X-NONE X-NONE <![endif]–><!–[if gte mso 9]> <![endif]–><!–[endif]–>

Spot/Stain

First Attempt

Second Attempt

Third Attempt

Beer

1

3

Blood

1

2

Butter or Margarine

4

1

Candle Wax

5,

then lay a towel or paper bag over top remaining wax, and iron it on medium heat, heating the wax and transferring to towel.

Chewing Gum

Harden gum with ice until brittle,

5

4 or use a commercial chewing gum remover

Chocolate

5

1

2

Cocktails

1

3

Coffee

1

3

Cough Syrup

1

2

Crayons

5

4

Egg (raw)

Blot

4

2

Food Coloring

1, until color no longer transfers to towel

2

Fruit Juice

1

2

Furniture Stain

4

Glue

1

4

Gravy

1

2

Greases

5

4

Ice Cream

1

2

Ink (ballpoint)

4

Ink (India)

4

Jam or Jelly

1

2

Ketchup or Tomato Sauce

1

2

Lipstick

5

2

Mildew

1

2

Milk

1

2

Mucilage

1

2

Mud

5

1

2

Mustard

1

3

Nail Polish

4

Apply amyl acetate or nail polish remover to cloth and blot.  PRETEST FIRST

Oils

4

Paint (oil based)

4

Paint (water based)

1

Rubber Cement

Roll the glue off when it has hardened sufficiently

4

Rust

Apply rust remover or warm oxalic acid solution for 10 – 15 minutes

2

Shoe Polish

4

Soft Drinks

1

2

Soot

1

4

Tar & Asphalt

5

4

Toothpaste

5

3

Urine

Blot as much as possible if still wet

1

3

Vomit

Blot as much as possible if still wet

1

2

Wine

1

3

Complaints Into Compliments: How Scotchgard Met a Strata’s Expectations

During a recent staff meeting, one of our technicians told the following story:

“I’m doing a carpet maintenance program at a building downtown.  They have called to complain about their lobby carpet outside of the elevator being dirty several times.  It is a high traffic area; people are bringing their bicycles and garbage out through there, so it always looks dirty.

I’ve gone back to re-clean and re-clean, but the area out front always looks dirty.  So, I was getting really frustrated, always going back.  Then I went in, roto-scrubbed the carpet, steam extracted it with the truck mount, bonnet cleaned it after, got the carpet looking really good and clean.  Then, I put Scotchgard down.  I didn’t even tell them, I just put it on the carpet.

They don’t call me anymore.

Now out front the carpet looks really good.  When I go in and do the maintenance, there are a couple of spots or stains but they just come right out.  It was worth it for me to cover the expense myself.  It saved me going back over and over, and the customer is happy now.

Carpet Care – The First Two Steps

Soil transfer is responsible for the majority of dirt in buildings.  Airbourne particule settles into carpet as well, but most dirt and moisture comes in on the bottom of shoes.

According to literature produced by The Mohawk Group, it has been estimated that it costs more than $500 to clean 1 pound of dirt tracked into a building.  Up to 24 pounds of dirt can be tracked in by just 1,000 people coming through an entrance over a 20 day period.

The best way to keep your carpet clean is to keep the dirt out.  The first line of defense for your buildings is composed of entrance mats.

I was recently called to a building by a property manager because the residents were complaining that the carpets appear dirty.  She was concerned that the carpet maintenance program we have in place might not be working if they were getting complaints so soon after a maintenance clean. Upon inspection and conversation with the on site caretaker it was obvious that the carpets were not getting stained, there was a two fold problem that existed instead – no entrance mats, and an appearance problem related to vacuuming.   The large strata tower had only one small entrance mat outside of the main lobby door.  There was nothing inside the entrance lobby, or inside the parking area elevator lobbies.  These points are critical in preventing soil from entering the building.

Dirt, lint, leaves, muck, dust – all of these things were being tracked onto the carpets, and overwhelming the caretaker’s  vacuuming efforts.  With the fall rain and an active construction site right next door butted up against the sidewalk, the lack of entrance mats had made a very obvious impact.

Once the dirt is inside the building, the next step is to vaccuum it up and out. Not only does it look unsightly, particulate becomes trapped in carpet fibres and grinds against them causing premature wear and damage if not removed.  This is especially important with winter coming and salt and sand soon to be upon our outdoor surfaces, and on the bottoms of our shoes.  However without using the right vacuum or vacuum approach, even the best efforts can yield less than satisfactory results.

That is why this article focuses on the first two parts of any carpet maintenance program for any building.  It cannot be stressed enough the importance of the primary barrier created with: Step  – entrance mats, and the first wave of attack using Step 2 – the proper vacuum cleaner and techniques.

Entrance Mats – Walk Off Mats – Welcome Mats

Step One.

Every major carpet manufactuerer stresses the importance of using entrance mats to ensure the lifespan of your carpet, and to keep your warranty valid.   This is due to the mechanics of soil transfer.

Simply put – dirt is transferred from dirty areas to clean areas.  It leaves the surface of the sidewalk, the lawn, the parkade, etc., adheres to the sole of your shoe, and is removed by friction caused by carpet onto a cleaner surface, clinging to that surface instead.  This process continues until the carpet is so dirty that when you enter an area, your shoes are cleaner than the carpet.  It then adheres to the sole of your shoe again, until it reaches a cleaner area of the carpet and transferrs, spread out the soiled area.  This is not a welcome scenario.  It is also the reason for the entrance mats.

If people enter a building and walk across an entrance mat – a small removable section of carpet or matting specially designed to remove the soil from your shoes, the dirt will then adhere to it, instead of being tracked into the building.  A very important point to remember however is this: clean the entrance mats!  They should be shaken out, vacuumed, and cleaned as often as possible.  Otherwise, once they have trapped enough dirt, they become a source of soiling due to the scenario described above.

So how do you pick out an entrance mat, and how big should it be?

The bigger the better.  The more steps a person must take across the entrance mat before stepping off of it, the more effective it is.  This results in more foot to mat contact and therefore more soil removal from the bottom of the shoes.  Tiny 3’ x 4’ welcome mats, while often cute or visually appealing, are not enough.  Most people will not stand in one place and wipe their feet sevearl times on a tiny mat before moving onto the carpet.  Therefore, with a mat that size, one foot may step on the mat one time.  The other shoe then steps onto your carpet having no soil removed at all.  That is definitely not enough, especially in large multi-unit strata buildings.

According the The Mohawk Group, a 15’ long walk-off area can effictively remove about 80’ of soil and moisture before it reaches the carpet.   Lees Carpet Manufacturers recommend at least 6’ minimum at the entrance to a building.  They also point out that it will “reduce the potential of slip and fall accidents on hard surface flooring during wet weather.”  Get the biggest entrance mat that you can, or line up and overlap a few to create an effective entrance area.  Keep in mind you want people walking on them first before the carpet at any commonly used entrance point, so check your side exits and parkade lobbies as well, and make sure they are in place there too.

With winter approaching, make sure your entrance mats are up to the demands of Vancouver wet: the snow we do get, the rain, the slush.  There are mats composed of more rubberized materials which are a good winter choice.

Once in place, maintain the entrance mats.  Ensure that they are shaken out and vaccuumed as often as possible.   That brings us to step two – the second most important step involved in extension of carpet appearance, lifespan, and maintenance: vacuum cleaning.

Vacuuming

Step Two

We all know vacuuming is an essential part of keeping your carpets clean and protected.  It removes dry particulate, helps prevent abrasion from sand and salt in the winter time, and allows the deep cleaning done by professionals to yield the best results.  But how do we vacuum?  Who taught us what is best, what type is best, and is that information correct?   I learned that I don’t use proper vacuuming technique at home, and so I’ll be adjusting my methods.  But before we get to that, are we even using the right type of vacuum cleaner?

All vacuums are not created equal.  Maybe you should be asking Santa for a new vacuum for your home, or better yet, playing Santa and bringing them to your stratas based on what is needed to ensure the carpets are cleaned as well as they can by the onsite staff.   Here are some comparisons to see why.

Types of Vacuums

The following comparisons are taken from ConsumerReports.org  All testing referred to in this article was done by their team. Visit their website for even more great information regarding vacuum cleaners.

Upright vacuums

This traditional design is still the most popular. Uprights tend to cost less than canister vacuums.

Pros: Uprights generally provide a wider cleaning swath than canisters, and they tend to be better at deep-cleaning carpets. Most are also easier to store.
Cons: You must drag the entire machine back and forth for most floor and carpet cleaning. The top performers we tested weigh 20 pounds or more, although many competent machines are much lighter. Uprights also tend to be noisier than canisters overall.

Canister Vacuums

The best ones clean carpets just about as well as uprights. (Pet owners note: The uprights and canisters that did best at regular cleaning also tended to excel at picking up cat and dog fur.)

Pros: Canisters tend to be better than uprights for cleaning bare floors, drapes, upholstery, and under furniture, and they’re easier to handle on stairs. Most are quieter, and you mostly need to move only the hose and powerhead, not the entire machine.
Cons: The entire vacuum tends to be heavier and bulkier than an upright, and the hose and wand make a canister harder to store.

Central Vacuums

Although they’re convenient, central vacuums are pricey, and they typically require professional installation.

Pros: They’re even easier to use than a canister. You carry only the hose and powerhead, and there’s no vacuum body to pull along. Central vacuums tend to be relatively quiet, and they don’t need to be emptied frequently.
Cons: Their 30-foot hose can be cumbersome and takes up storage space. And there’s no place to store cleaning tools while you work.

Small Vacuums

These miniature electric models come with or without a power cord.  They’re handy for small spills, getting into hard to reach places, and easy to store.  They should never be used as the primary method of vacuum cleaning.

Pros: They’re handy for light, quick surface cleaning on short-pile carpets and bare floors.
Cons
: They lack the power and capacity of full-sized models.

Robotic Vacuums

Think of these more as expensive novelties than practical appliances.

Pros: Do the grunge work while you relax. In uncluttered rooms, a robotic vacuum can fill in between regular vacuuming sessions.
Cons: They’re time-consuming to set up and run, and they tended to miss edges and corners in our tests. Some also tended to close doors behind them, locking themselves in a room.

Stick Vacuums

Stick vacuums generally provide smaller capacities than upright models but they do weigh less. Like uprights, they have long bodies and handles, and foot nozzles. Many are battery powered. They are mainly for picking up surface litter and not a replacement for a good performing deep cleaning conventional vacuum.

Pros: They’re convenient when you need to quickly clean up a mess. Plus, they eliminate your having to bend to clean up a dirty floor.
Cons: Most don’t perform as well on carpet as handheld vacuums, the capacity of their dirt bin is typically small, and most are fairly noisy.

These last three types of vacuums are not feasible for use in strata buildings.  They just don’t have the power to do the job.  The best possible of the above choices is a powerful upright with the following most important features.

Important Features

For strata building maintenance here are the most important features to ensure your vacuum works the way that it should!

Brush Agitator or Beater Bar

Also known as the roller brush, it is found underneath the machine. This roller has bristles attached to it and spans the width of the base. It spins when the machine is on and dislodges dirt, dust, and grit from the carpet so that the airflow can pick it up easily. Some models have a switch to turn the brush agitator off when cleaning bare floors; a rotating brush on a bare floor can move dirt and debris around before it can be sucked up. The switch also makes it less likely that throw rugs, bedspreads, and the like will inadvertently become tangled in the roller brush. And it eliminates any hazard should the vacuum tip over while you have the hose extended.

Carpet-height adjustment

This feature adjusts the height of the machine to a carpet’s pile height to allow for easy movement and thorough cleaning. Adjustments are automatic on some models, but we prefer manual control

Edge Cleaner

Models with this feature (including most uprights and some canisters) can pick up debris under the entire area of the cleaning head. That’s useful when cleaning wall-to-wall carpeting–the vacuum can clean right up to where the carpet meets the wall.

*This feature can be extremely important in reducing filtration marks.  Often vacuuming right near the edge of hallways does not get done without a vacuum having this type of feature.

Filter

A growing number of vacuums are claimed to do a better-than-standard job of filtering out fine particles that may pass through the machine and escape into the air through the exhaust, either through the bag or a separate filter. Micron filters can provide a higher level of filtration than standard models, but possibly not as high as high-efficiency particulate-air (HEPA) filtration. HEPA filtration might benefit someone with asthma. It provides the highest level of vacuum-cleaner filtration. In our tests, models with a HEPA filter have been very effective at reducing emissions. However, some models that don’t have HEPA filters have performed just as well in our tests, and such vacuums may cost less than HEPA model.

Conclusions

We know the best type of vacuum to have on site will be a stand up.  It should have cylinder brushes which contact the pile surfaces of the carpet.  Adjustable height to ensure that this is happening is recommended, and the bristles on the beater bar should be inspected periodically for wear.  If too worn down, the machine should be replaced.  Twin motor machines – those with a separate motor for suction and carpet agitation – are the best.    Top loading soil bags and HEPA filters are the best.  When a vacuum bag is over 75% full, it looses much of its’ effectiveness.  Therefore, staff should always have many vacuum bags on hand and change them often.

So now that we know we have the right type of machine being used in our buildings to vacuum up the dirt, it would be a good idea to ensure that is what is being used.  The next thing to check would be: are people performing the vacuuming correctly?  After all, it is not just what you use, but how you use it.

3 Common Misconceptions About Carpet Cleanin

Here are three of the most common questions we get from building managers in regards to carpet cleaning. We’re busting the myths – or misconceptions – in order to help everyone better understand what they should expect from a properly run maintenance program be it with us or with a Charlottesville carpet cleaning service closer to you.

#1. Maintenance cleaning should take as long as the hot water extraction cleaning.

False.

The primary part of this type of cleaning comes from the rotary agitation of the interim cleaning machine. (1 of the 4 elements as described in the first article above, and more about the type of machine listed in the article directly above.) Because the machine spins so quickly, it uses the element of agitation primarily and can be pushed more swiftly across the carpet, this method is much faster than hot water extraction cleaning. Time does not need to be taken to ensure water is extracted from the carpet.

A properly trained technician can get excellent results for the interim maintenance cleaning in half the time as the restorative, hot water extraction cleaning. You can find such professional technicians, in almost all the carpet cleaning services. Try and look for them!

#2. We only need to do the hot water extraction 1x per year for the carpets to stay clean. We can skip the interim cleaning methods.

False.

Every carpet manufacturer will explain that this voids the warranty of their product.

Carpet is not capable of having an extended lifespan with only vacuuming and once per year hot water extraction carpet cleaning. All manufacturers’ recommendations include interim maintenance methods combined with hot water extraction, often described as a restorative clean. Only cleaning with hot water once per year is neglecting the carpets, and will cut their lifespan in half. You may have to take extra precautions or hire experts such as Chem-Dry of Charleston who can get the carpets cleaned professionally. By waiting for a year to see the heavily soiled carpet, and then attempting to bring it ‘back to life’, you’ve waited too long. Permanent damage is done, and the more this neglectful method is used, the more cumulative those effects become. By using a certified professional company like ServiceMaster Residential, your history of carpet maintenance works in your favor if replacement due to manufacturers’ defect is ever in question.

#3. I don’t have to vacuum the carpet today, the carpet cleaners are coming, and that will take care of it.

False.

According to industry analysis, 74% – 80% of soil present in carpet is particulate or fibrous dry soil, and that 85% of soil can be removed through routine vacuuming.

79% – insoluble soils, sand, quartz, clay, carbon

10% – petroleum, oils, grease, tar, animal and vegetable oil

6% – sugar, starch, salts

5% – moisture, unknown residues

If that particulate is left in the carpet before a rotary maintenance clean or hot water extraction, the cleaning of deeply embedded soil is blocked by those soils which could have been easily removed. It also can clog up the vacuuming part of the hot water extraction system, making it less effective, and lengthening drying times. Vacuuming before the experts arrive for a carpet cleaning service always increases the effectiveness of the service visit.